Thanksgiving Turkey Cookies | |||||||||||||||
 | |||||||||||||||
Ingredients
| |||||||||||||||
| |||||||||||||||
Directions
| |||||||||||||||
Friday, November 20, 2009
Thanksgiving Turkey Cookies


Monogrammed Towels
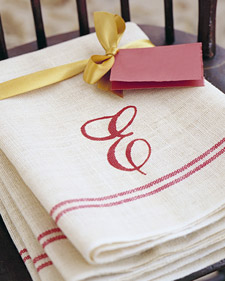
A present bearing a hand-painted monogram shows affectionate effort. Use a set of hand towels and a letter stencil. Lay towel over a sheet of paper. Center stencil on towel and, holding it firmly, apply two coats of washable fabric paint with a medium-size brush. Remove stencil, and let dry, about three hours.

Bath Fizzies

Ice-cube trays serve as molds, giving the fizzies their shape. Using a flexible silicone model lets you slide the cubes out smoothly without breaking them.
Show off the colors of the bath fizzies in glass jars with screw tops, the kind used for storing sugar and flour. Pack each type of fizzy in a separate jar so the scents won't meld. Write the name of the scent on a vellum tag (choose a shade that matches the fizzies), and punch a hole in the top. Thread the tag with ribbon, and tie it around the jar.
Citric acid, a common food additive, is available at wine-making-supply stores, some spice shops, and online. When citric acid is combined with baking soda and placed in water, a chemical reaction creates bubbles.
Makes 1 dozen (use 2 per bath)
Tools and Materials
1/2 cup citric acid
1 cup baking soda
3/4 cup cornstarch
1/4 cup organic cane sugar
About 6 drops food coloring
10 to 15 drops essential oil(s)
Special equipment: 2-ounce travel-size spray bottle, plastic pipette, silicone ice-cube tray, storage jars
Directions
1. Stir together citric acid, baking soda, and cornstarch in a glass measuring cup.
2. Pass mixture through a fine sieve or a flour sifter into a mixing bowl. Stir in sugar.
3. Fill spray bottle with water, and add food coloring. Spritz mixture lightly (it should become damp but not fizzy) until you can pack mixture with your hands.
4. Using pipette, add oil, 1 drop at a time, until strength of scent is to your liking. Using a metal spoon or your hands, mix ingredients until color is even throughout (mixture will begin to dry out; when this happens, spritz until packable again).
5. Spoon into ice-cube tray, pressing firmly. Let dry at room temperature overnight. Pop out of tray gently. Transfer to jars.

Jingle Bell Wreath

The wonderfully familiar sounds of the holidays often get shut out while we're keeping warm indoors. Hang this wreath where it will be heard (on a door, for instance), and bring the ring of sleigh bells to all the rooms in the house. Form 16-gauge wire into a circle. Make a closed loop at one end with needle-nose pliers. Thread jingle bells onto the open end in any size and color combination. When the wire is full, join its ends by twisting the unlooped end into a hook, and fasten it onto the closed loop. Tie a piece of ribbon into a bow; secure it to the bottom of the wreath with 24-gauge wire.
Cinnamon Candles

Small forests of cinnamon sticks give pillar candles a warm, rustic look and impart a holiday fragrance. Three candles in graduated sizes make a lovely set.
Look for 8-and 16-inch cinnamon sticks at floral-supply stores.
Tools and Materials
Pillar candle, at least 3-inches in diameter
Cinnamon sticks
Floral shears
Hot-glue gun
Dish or coaster
Cinnamon Candle How-To
1. Measure candle height; cut cinnamon sticks to size with floral shears. You'll need about 20 lengths per candle.
2. Run hot glue along cinnamon stick; affix it vertically to side of candle. (Use low-temperature setting to minimize melting.)
3. When first stick is dry, glue next stick snugly against it; repeat to cover candle.
4. Place finished candle on a dish or coaster.
Candy Sticks
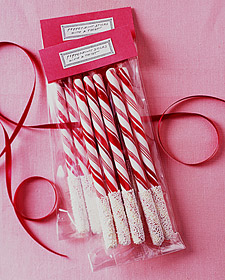
Dip these Christmas standbys in white chocolate and nonpareils for something extra-sweet. For 50 peppermint sticks, you'll need 8 ounces of white chocolate and 1 1/2 cups of white nonpareils.
Candy Sticks How-To
1. Put the chocolate in a heatproof bowl set over a pan of simmering water; stir until melted. Let cool slightly.
2. Dip peppermint sticks in chocolate; spoon nonpareils over chocolate. Stand candy, coated end up, in a loaf pan filled with dried beans; refrigerate until set.
3. Package candy in cellophane bags. Cut rectangles out of card stock the width of the bags.
4. Fold them over the tops of the bags; staple shut. Affix labels over staples.

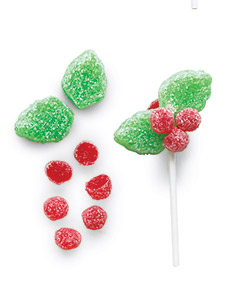
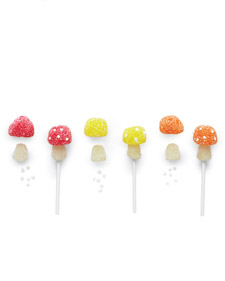
Gumdrop Pops

Stack gumdrops, dot them with sprinkles and other candies in creative ways, and watch the colorful confections come to life as snowmen, Santas, and other icons of the season. Wrap the candy pops in cellophane bags, and then attach them to gifts or slip them into stockings. Or create a holiday display: Partially fill a large glass jar with sanding sugar, and stand the figurines on flower frogs in the sparkling "snow."
Slide gumdrops onto candy sticks to create body of each pop. (Use leaf-shaped gumdrops for holly pop.)
For Santa
Use top half of 1 small gumdrop for hat. Trim 2 oblong candies for arms. Use candy-coated seeds for buttons and pom-pom. Poke candy where facial features will go with a skewer; use sticky tip to pick up and place nonpareils for eyes and nose.

For Tree
Use 1 flattened gumdrop for base of tree. Use 1 small gumdrop for trunk. Cut sides from 1 gumdrop; press sides around top of stick, for treetop. Flatten 1 gumdrop; using an aspic cutter, cut out star. Insert sprinkles for lights.

For Snowman
Trim top of head; top with 1 candy wafer and half of 1 small gumdrop for hat. Using a skewer (see "For Santa"), place nonpareils for eyes, mouth, and buttons. Insert sprinkle for nose.

For Holly
Use halves of small gumdrops for berries.
For Mushroom
Use 1 small gumdrop for stem. Use sequin sprinkles for dots.


Hot Chocolate on a Stick
October 23rd, 2009
how to make HOT CHOCOLATE ON A STICK

Oh how I love when the weather turns cold enough for hot chocolate. Something about a good cup of hot chocolate makes the world feel like a gentler place.
This idea is something I’ve been wanting to try for a couple winters now. I’m glad I finally took a day to puzzle it through and do a little taste testing, because it turned out to be so simple, and the results so delightful. Stir one of these sticks into a cup of steaming milk or cream and in two minutes you will have transformed it into a cup of rich hot chocolate, the blessed stuff. I can’t help feel that the act of stirring adds to the experience, soothing you over while building up the anticipation for that first sip.
And for those of you who appreciate a little froth, this recipe lends itself to some serious frothiness. In fact, if you’re at a loss for a holiday gift, whip up a few of these sticks and throw in this very affordable frother and you’ve got a bundle of pure happiness to give away. Or visit my gift index here for more edible gift ideas or here for more party favor ideas.
First things first: what chocolate to buy
The trick to making the best hot chocolate on a stick is using good, serious chocolate that melts easily. A chocolate with a high percentage of cocoa butter will do that. More cocoa butter means quicker melting. A bag of every-day chocolate chips won’t melt as fast. You can also find fake chocolate (like a bag of Wilton’s candy melts), which uses vegetable fats instead of cocoa butter. It will melt well, but the resulting cup of hot chocolate won’t be as transcendent. And we’re going for transcendent here. If you really want to go gourmet, use couverture (made for dipping truffles, which has up to 39% cocoa butter, such as this), and don’t just melt your chocolate, temper it. A bag of real-chocolate wafers made for a chocolate fountain will work beautifully.

Word of warning: no water!
There is one thing you need to know before working with chocolate if you don’t already: never let water touch it. Not a drop. You can be stirring a potful of smooth, decadent melted chocolate, then get one drop of water in it and the whole thing will get grainy and seize up and you have to scoop the whole mess into the garbage. It’s a sad experience. Don’t let it happen to you.
So then, if you’re planning to introduce vanilla, use a vanilla bean or vanilla paste, not vanilla extract. If you want to add food coloring, use a gel or powdered form, not the liquid stuff.
Hot Chocolate on a Stick
Yield: 10 cubes of hot chocolate (ice-cube-tray size)
(use 1 oz. hot chocolate on a stick per every 1 cup milk or cream)
Equipment:
Ziplock bags or piping bags
A double boiler or pan with a glass bowl that can sit over the simmering water
Some kind of chocolate mold, ice trays work great
Stir sticks or a bag of wooden craft sticks like I used (like these, available at any craft store)
Ingredients:
8 oz. chocolate (with at least 70% cocoa butter, see note above), bittersweet, semisweet, milk, and white chocolate all work
1/4 cup cocoa, Dutch processed if possible, sifted
1/2 cup confectioner’s sugar, sifted
pinch of salt
6 cups milk and 2 cups heavy cream if you plan to enjoy these right away
Method
- If your chocolate is in a block, chop it into meltable pieces. Simmer a couple inches of water in a pan and place glass bowl over the top to make a double boiler. Be sure the bottom of the bowl does not touch the water beneath it, and regulate the heat so the water stays at a simmer. Dump chocolate into the clean, dry bowl and stir as the chocolate melts.
- Once the chocolate is 2/3 melted, with just some pieces of the chocolate unmelted, remove the pan from the heat and continue stirring until chocolate is fully melted.
- Add cocoa, sugar, and salt and continue to stir until combined.
- Lift the bowl off the pan and use a towel to dry off any drips of water. Pour chocolate into a ziplock bag and clip off the corner.
- Pipe the chocolate into your chocolate mold, tapping the mold on the counter to make sure all the chocolate settles into the mold. Add a stir stick and you’re done. The stir stick should stay upright without any trouble.
- Let the chocolate cool either at room temperature or in the fridge if you’re in a hurry.
- If you don’t like the look of the chocolate once it is removed from the mold, you can dip the cubes into a new batch of plain melted chocolate for a shinier finish. This also lets you add sprinkles or crushed candy or just lets you dip in fun patterns. I like dipping at an angle into a different color of chocolate.
- In order to enjoy these, heat up any combo of milk, water, half and half, or cream. I like 6 cups milk with 2 cups heavy cream. One ounce of chocolate on a stick should be melted into one cup milk or cream. So a standard ice cube-tray block, which is 3/4 an ounce, should be melted into a mug with 3/4 cup milk or cream in it.
How to store it: Chocolate will keep in an airtight container for up to a year. Don’t keep it in the fridge because it is really good at absorbing odors.

Variations: Try adding a pinch of cardamom, anise, allspice, nutmeg, cinnamon, malted milk powder, or cayenne pepper, depending on your mood. We tried adding a little extra punch by lining the outside with red hots. Very fun. You can also leave out the cocoa and sugar all together and replace it with 8 servings of your favorite packaged hot cocoa. Have you ever had so much fun? I love playing with chocolate.
As you can see, we played around with a few different molds, like this water bottle ice cube mold from IKEA. The classic ice cube mold was my favorite though. It works best for submersing the entire block of meltable chocolate in a standard mug.
UPDATE: Love Prince Pi’s suggestion of molding these in shot glasses. Also love how the Kitchn (yea!! they tried my recipe!!) made do with a single pan. TinaMarie also made the great suggestion of using small Dixie cups.
This was fun too. My son thought the resulting blocks looked like the shape of strawberries.
Art Canvas
Even if you're expecting coal this year instead of diamonds, you can fill the house with faux gift boxes and dream. Wrap blank art canvases in assorted shapes and sizes with colorful ribbon, then prop them up on a mantel for a cool yet cheerful study in white. And next year, be good for goodness' sake.

Peppermint Wreath

Take a color cue from a favorite holiday treat. Peppermint red and white make a fun and fresh Christmas color scheme. To make this wreath, wrap clear string lights around a wreath form and hot-glue red-and-white fish bobbers of various sizes to the form. Finish with a ribbon bow inspired by peppermint.
Ornament Tree

Topiary Balls

For a cool color scheme, mix Kelly green with peacock blue and silver. To create this festive topiary, remove the caps from glass or plastic ball ornaments and attach the ornaments to a foam ball with hot glue. Insert a dowel into the foam ball. Tightly wrap the dowel in ribbon, stopping before you reach the bottom. Fill a hobnail vase or other container half-full with modeling clay; insert dowel. Top clay with marbles.
Decorative Lightbulb Balls
Decorative Light Bulb Balls
Supplies
- Disposable foam brush
- 5-inch-diameter plastic-foam ball
- Acrylic paint in the same color as the bulbs
- C9- or C7- Christmas bulbs
- Glue gun and hotmelt adhesive


Instructions
- Use the foam brush to coat the plastic-foam ball with acrylic paint. Let dry.
- Insert the screw end of a lightbulb into the foam ball until the glass touches the ball.
- Remove the bulb and apply a drop of hot glue to the end of the bulb. Immediately reinsert the bulb into the hole.
- Working outward from the first bulb, continue attaching bulbs in the same manner until the ball is covered with bulbs.
Homemade Bath Salts

Turn a plain old soak into a real retreat with bath salts you make yourself. Start with about 4 cups of sea salt or kosher salt. Mix in several drops of an aromatic bath oil (available at bath and beauty stores) and, if you wish, dried fragrant plants, such as lavender or eucalyptus. Pour into a jar for yourself or to give as a gift. Use a few spoonfuls of salts per bath; to keep herbs from floating, spoon the mixture into a spice sachet (available at gourmet grocery stores).
Subscribe to:
Posts (Atom)